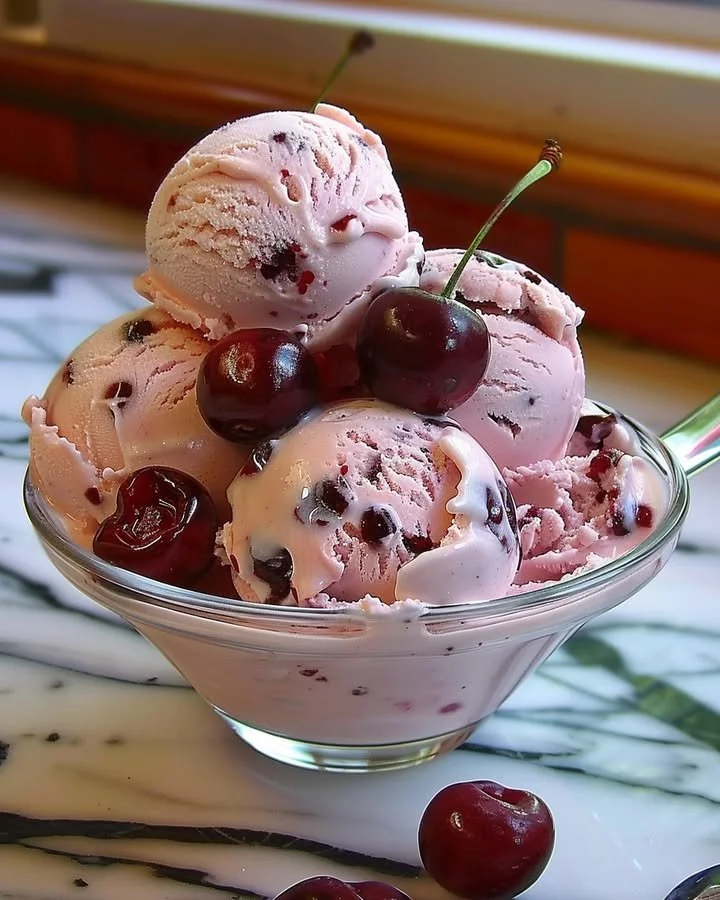
Homemade Cherry Ice Cream
The moment you think of Homemade Cherry Ice Cream, a sensational burst of flavors, creamy textures, and nostalgic aromas fills the air. With every scoop, you are welcomed into a world where sweet and tangy cherries dance harmoniously with rich cream and sugar, crafting an irresistible dessert that transports you to summer days spent under the sun. This recipe offers a step-by-step guide to create a luscious treat that not only cools you down on a hot day but also fills your heart with warmth. Get ready to delight your senses and impress your loved ones with this wonderfully easy and utterly delightful cherry ice cream!
The history of cherry ice cream dates back to the ancient Romans, who enjoyed variations of frozen desserts made from snow and fruit. Over time, this delightful treat transitioned into what we know today. In the 18th century, when ice cream became a popular delicacy in Europe, it spread to America where it became a staple. Cherry ice cream, in particular, has always been beloved for its vibrant color and refreshing taste, making it a perfect go-to dessert for summer picnics and family gatherings.
To create your dreamy homemade cherry ice cream, you will need the following ingredients: 2 cups fresh cherries, pitted and halved for that tender bite; 1 cup heavy cream, creamy and rich to provide the base; 1 cup whole milk, ensuring a smooth texture; 3/4 cup granulated sugar, sweet as summer itself; 1 teaspoon vanilla extract, adding aromatic depth; and a pinch of salt to bring all the flavors together harmoniously. Each ingredient is carefully selected to reinforce the wholesomeness and deliciousness that halal cooking embodies.
When it comes to creating your homemade cherry ice cream, the cooking time can vary significantly based on preparation methods. Quick preparation may involve using an ice cream maker while the slower route can mean hand-churning or waiting longer for the mixture to freeze. Regardless of your choice, the goal remains the same – to create an indulgent treat that captures hearts. Remember to keep your ingredients fresh and your workspace organized to ensure success.
Step 1: Begin by tossing the pitted and halved cherries into a medium bowl with 1/4 cup of granulated sugar. As the sugar envelops the cherries, let them sit for about 30 minutes to macerate. This crucial step enhances their natural sweetness and elevates their flavor, setting the stage for a cherry explosion in your ice cream.
Step 2: While the cherry mixture is developing its flavors, in a separate bowl, whisk together the heavy cream, whole milk, the remaining sugar, vanilla extract, and a pinch of salt. Whisk it gently but thoroughly until the sugar is fully dissolved and the mixture takes on that inviting creamy texture. The harmonious blend of these ingredients is sure to anticipate the magic to come.
Step 3: Once your cherry mixture is ready, carefully fold it into the cream mixture. Use a spatula and stir gently until fully combined, bringing together the lusciousness of the cream and the sweet juiciness of the cherries. Let your senses guide you as you appreciate the vibrant colors and intoxicating aromas.
Step 4: Now it’s time to churn! Pour this delightful mixture into your ice cream maker. Turn it on and watch as it transforms. Follow the manufacturer’s instructions, but keep an eye out for that beautifully creamy, soft-serve consistency you’ll want to achieve.
Step 5: When your ice cream has reached this stage, it’s time to transfer it into a lidded container. Pop it in the freezer for at least 4 hours, or until it’s firm enough to scoop. The anticipation will be worth it as the flavors meld together and create that dreamy texture.
Step 6: Finally, serve up generous scoops of your homemade cherry ice cream in a bowl or cone. As you take a bite, enjoy the sweet, creamy goodness that unfolds around your palate. It’s pure bliss!
Pair your homemade cherry ice cream with a drizzle of chocolate sauce or a sprinkle of nuts for added texture. Serve it at picnics, birthday parties, or sunny patio gatherings. It’s the perfect dessert to share with family and friends, creating memories that will last a lifetime.
Common mistakes to avoid when making homemade cherry ice cream include using unripe or overly soft cherries, which can impact the texture and flavor significantly. Remember to check your ice cream maker’s instructions thoroughly to avoid any mishaps. Also, be patient with the freezing time; lifting the lid too soon can interrupt the churning process, leading to a grainy texture.
For a healthier alternative, consider using coconut cream instead of heavy cream for a dairy-free version, or sweetening with natural alternatives like honey or maple syrup. Variations are limitless; try adding a splash of lemon juice for a citrus twist or incorporating chopped dark chocolate for a decadent experience.
FAQs:
Can I use frozen cherries instead of fresh?
Yes, frozen cherries work well! Just make sure to thaw and drain excess liquid.How long can I store homemade ice cream?
Homemade cherry ice cream lasts about 2-3 weeks in the freezer if stored in an airtight container.Can I make this recipe without an ice cream maker?
Yes! You can place the mixture in a shallow dish and freeze it, stirring every 30 minutes until it reaches the desired consistency.Is it possible to reduce the sugar in this recipe?
Absolutely! You can adjust the sugar to your liking, but remember that sugar helps create a creamy texture.What is the best way to serve this ice cream?
Serve it in bowls or cones, alongside fruit toppings or a drizzle of chocolate sauce for an extra treat!How can I make this recipe vegan?
You can substitute heavy cream with coconut cream and use almond milk to make a delicious vegan version!
The summer sun beckons you to indulge in the sweet embrace of homemade cherry ice cream. Imagine sitting with loved ones, laughter filling the air, as you scoop this delightful creation into cones and bowls ready to relish. The taste of luscious cherries and velvety cream will likely leave you wanting more, turning a simple moment into a cherished experience. Don’t wait too long—gather your ingredients and try this delightful recipe immediately! You’ll never look at ice cream the same way again!
PrintHomemade Cherry Ice Cream
A delightful homemade cherry ice cream that combines sweet and tangy cherries with rich cream for a refreshing summer treat.
- Prep Time: 30 minutes
- Cook Time: 240 minutes
- Total Time: 270 minutes
- Yield: 4 servings 1x
- Category: Dessert
- Method: Churning
- Cuisine: American
- Diet: Vegetarian
Ingredients
- 2 cups fresh cherries, pitted and halved
- 1 cup heavy cream
- 1 cup whole milk
- 3/4 cup granulated sugar
- 1 teaspoon vanilla extract
- A pinch of salt
Instructions
- Begin by tossing the pitted and halved cherries into a medium bowl with 1/4 cup of granulated sugar. Let them sit for about 30 minutes to macerate.
- While the cherry mixture is developing its flavors, in a separate bowl, whisk together the heavy cream, whole milk, the remaining sugar, vanilla extract, and a pinch of salt.
- Once your cherry mixture is ready, carefully fold it into the cream mixture until fully combined.
- Now it’s time to churn! Pour the mixture into your ice cream maker and follow the manufacturer’s instructions.
- When your ice cream has reached a soft-serve consistency, transfer it into a lidded container.
- Finally, freeze for at least 4 hours or until firm enough to scoop.
Notes
Pair with chocolate sauce or nuts for added texture. Avoid using unripe cherries for the best flavor.
Nutrition
- Serving Size: 1 serving
- Calories: 350
- Sugar: 32g
- Sodium: 80mg
- Fat: 20g
- Saturated Fat: 12g
- Unsaturated Fat: 8g
- Trans Fat: 0g
- Carbohydrates: 45g
- Fiber: 2g
- Protein: 4g
- Cholesterol: 60mg