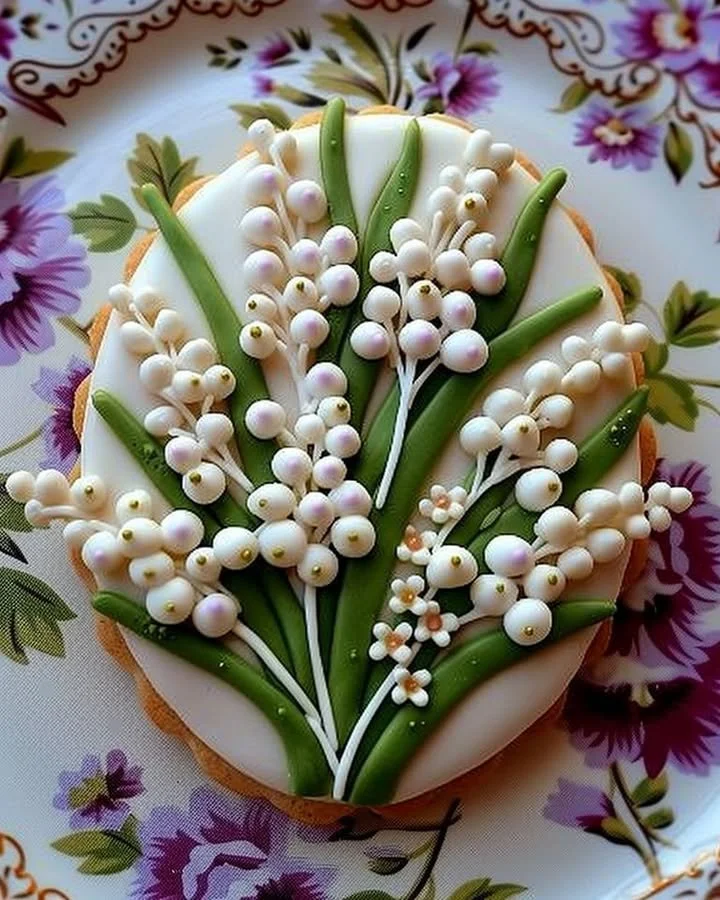
Lily of the Valley Decorated Sugar Cookies
The aroma of freshly baked sugar cookies wafts through the air, inviting you into a world of sweetness and delicate charm. Today, we will embark on a step-by-step journey to create Lily of the Valley Decorated Sugar Cookies. These beautiful treats, adorned with white and green royal icing, echo the soft elegance of springtime blooms. The rich, buttery texture paired with just the right amount of sweetness creates a delightful cookie that melts in your mouth. As you hold each cookie in your hand, you can’t help but feel a wave of nostalgia. They not only please the palate but also bring joy to the heart, making them perfect for gifting or sharing at special occasions.
History / Fun Fact
The origins of sugar cookies date back to the 1700s in Nazareth, Pennsylvania, where they became quite popular in American households. The simple, sweet dough quickly won the affection of many. However, decorating cookies gained cult status in the 20th century, bringing a whole new dimension to these tasty treats. The Lily of the Valley flower, known for its sweet fragrance and delicate appearance, adds a lovely visual appeal to this classic recipe. Symbolizing purity and happiness, these cookies take on an added layer of meaning, making them ideal for celebrations such as graduations, weddings, or spring-themed gatherings.
Ingredients
To create your enchanting Lily of the Valley Decorated Sugar Cookies, gather the following ingredients:
- 2 3/4 cups all-purpose flour, fine and light, waiting to be transformed into a dough.
- 1 teaspoon baking soda, which will give your cookies a tender lift.
- 1/2 teaspoon baking powder, ensuring a perfect rise.
- 1 cup unsalted butter, softened to creamy perfection, lending richness to every bite.
- 1 1/2 cups sugar, sweet granules ready to bring warmth and sweetness.
- 1 egg, a little golden orb that binds and enriches.
- 1 teaspoon vanilla extract, aromatic and inviting, for unmistakable warmth.
- 1 teaspoon almond extract, evoking a delightful nuttiness.
- 1/2 teaspoon salt, enhancing and balancing the flavors.
- 2-3 tablespoons milk, adding just the right moisture to the dough.
- White and green royal icing (for decoration), bringing your floral vision to life.
Every ingredient is carefully selected, creating a halal treat that can be enjoyed by everyone, with no worries at all.
Cooking Time & Tips for Lily of the Valley Decorated Sugar Cookies
Creating these intricate sugar cookies can be achieved through quick or slow preparation. A quick method involves mixing the dough and baking it in a hurry for unexpected gatherings. On the other hand, slow preparation allows you to savor each step, designing beautiful decorations and taking time to ensure every detail is perfect. Whichever method you choose, every cookie will turn out delicious!
To ensure your cookies are a hit, practice patience while creaming the butter and sugar for a light and airy mix. If the dough feels too dry, don’t hesitate to add milk gradually until you achieve the right consistency. Finally, for beautifully decorated cookies, allow the royal icing to set properly.
Step-by-Step Directions
Let’s turn our ingredients into delightful cookies!
First, preheat your oven to 350°F (175°C). The anticipation builds as the kitchen warms, hinting at the deliciousness to come.
Line your baking sheets with parchment paper, giving your cookies a perfect surface to bake upon, ensuring they won’t stick.
In a medium bowl, whisk together the flour, baking soda, baking powder, and salt. The dry ingredients mingle, creating a base for your cookies.
In a large bowl, cream the softened butter and sugar together until they reach a light and fluffy state, about 3-5 minutes. This is where you can smell the sweetness begin to bloom.
Add the egg, vanilla extract, and almond extract to the mixture and beat until everything is smooth. The combined flavors create an aromatic masterpiece.
Gradually add the dry ingredients to your wet mixture, mixing until just combined. Avoid overmixing, as this will keep your cookies tender and melt-in-your-mouth perfect.
If the dough feels stiff, add 2-3 tablespoons of milk, one tablespoon at a time, mixing until you can gather it into a cohesive ball.
Roll out the dough on a floured surface until it’s about 1/4 inch thick. Take in the soft texture as you roll; it’s a tactile delight.
Use your chosen cookie cutter to shape the dough into desired forms, like ovals or circles. Each cookie cutout shines with potential!
Place your beautifully shaped cookies on the prepared baking sheets and bake for 8-10 minutes or until the edges are lightly golden. The aroma that fills your kitchen will be nothing short of heavenly.
Once out of the oven, let your cookies cool on a wire rack, allowing them to firm up and retain their shape.
Now, the fun part begins! Once the cookies are cooled, awaken your inner artist and decorate with royal icing: use white for the lilies and green for the leaves. Take your time and let your creativity flourish.
Allow the icing to set before serving, gifting, or enjoying your creation. Each cookie becomes a little work of art.
Serving Suggestions & Occasions
These Lily of the Valley Decorated Sugar Cookies shine at many gatherings. Imagine serving them at a spring tea party, a bridal shower, or even as delightful favors at a wedding. Their floral design makes them an excellent choice for floral-themed events or to simply brighten someone’s day. Present your cookies on a decorative platter, surrounded by fresh flowers, to evoke the essence of spring.
Common Mistakes for Lily of the Valley Decorated Sugar Cookies
One common mistake is overmixing the dough. This can lead to tough cookies instead of light and tender ones. Additionally, be cautious with the baking time; removing cookies too early can leave them doughy inside, while leaving them in too long can lead to a hardened texture. Another pitfall is not allowing the icing to set properly before stacking or packaging, which can lead to a messy presentation. Lastly, the dough must be chilled if it’s too soft; if it seems unworkable, let it rest in the fridge for a few minutes before rolling.
Healthier Alternatives & Variations
For a healthier twist, consider substituting half the flour with almond or whole wheat flour for added nutrients. You can also reduce sugar slightly without losing the delightful sweetness. For a vegan alternative, swap the egg for a flaxseed meal (1 tablespoon of flaxseed mixed with 2.5 tablespoons of water will replace one egg) and use coconut oil instead of butter. Additionally, flavor variations can include citrus zest or spices like nutmeg or cinnamon added to the dough for a different take on taste.
FAQs
Can I freeze the cookie dough?
Yes, you can freeze the cookie dough for up to three months. Wrap it tightly in plastic wrap and store it in an airtight container.How long can these cookies be stored?
These decorated cookies can last for up to two weeks in an airtight container at room temperature.Can I use a different icing for decorations?
Absolutely! You can experiment with fondant, buttercream, or even chocolate frosting, but for intricate designs, royal icing is recommended.What can I use instead of almond extract?
If you don’t have almond extract, vanilla extract can be used instead, or you can omit it altogether for a more classic flavor.Are these cookies suitable for children?
Yes! These sugar cookies are a hit with children. They can also help with decoration, making it a fun family activity.Can I add sprinkles to my cookies?
Certainly! Sprinkles can be added on top of the royal icing before it sets for a festive touch.
The aroma of freshly baked sugar cookies filled your kitchen, and your heart just raced with delight as you decorated them like a blooming garden in springtime. Now it’s your turn to bring this beautiful recipe to life and create your own Lily of the Valley Decorated Sugar Cookies. The mere thought of sharing these sweet treats with friends and loved ones is enough to make you want to start baking immediately. So gather your ingredients, summon your creativity, and let the magic of these cookies unfold in your kitchen!