Chamomile Charm Holly Cookies Blooming with Holiday Magic are a delightful twist on classic holiday cookies, perfect for those looking to add a touch of whimsical charm to their festivities. These cookies not only look enchanting with their holly shapes and shimmering decorations but also deliver a comforting, buttery flavor that will surely bring joy to your holiday gatherings. With a blend of aromatic ingredients, these treats offer a nostalgic taste of the season that is simple to make. Whether you’re baking with family or prepping for a holiday party, this recipe ensures a fun and interactive experience for all.
Why You’ll Love This Recipe
There are countless reasons to fall in love with Chamomile Charm Holly Cookies. One of the most appealing aspects is their easy preparation. The straightforward ingredient list and simple instructions make this recipe accessible to bakers of all levels. With minimal ingredients and no complicated techniques, you can whip up a batch in no time. These cookies are a fantastic crowd-pleaser, sure to impress guests with their stunning aesthetic. Not only do they taste divine, but they also provide an opportunity for some creative expression as you decorate them with royal icing and edible embellishments. Finally, they evoke the warmth and nostalgia of the holidays, making them a truly special addition to your cookie tray.
Ingredients
To create these delightful Chamomile Charm Holly Cookies, you will need the following ingredients:
- 2 3⁄4 cups (345g) all-purpose flour: The foundation of our cookies, providing a soft and tender crumble.
- 1 cup (225g) unsalted butter, softened: Rich and creamy, this ingredient adds depth of flavor and ensures a melt-in-your-mouth texture.
- 3⁄4 cup (150g) granulated sugar: For that perfect touch of sweetness, balancing the buttery richness.
- 1 large egg: Binding everything together while contributing to the light structure of the cookies.
- 1 tsp vanilla extract: Enhancing the flavors with its warm, inviting aroma.
- 1/2 tsp almond extract (optional): An aromatic note that adds depth and dimension.
- 1/2 tsp baking powder: A necessary leavening agent to give the cookies a bit of lift.
- 1/4 tsp salt: Elevating all the flavors in the mix.
- 4 cups (480g) powdered sugar: Essential for making the royal icing that will beautifully coat your cookies.
- 3 tbsp meringue powder: Providing stability and structure to the icing.
- 5-6 tbsp water: Adjusting the consistency of your icing.
- White gel food coloring: For that classic white icing that brings a snowy appearance to your sweets.
- Gold edible paint or luster dust: A touch of glam that takes these cookies from ordinary to extraordinary.
- Small gold sugar pearls: Adding a whimsical touch that sparkles with holiday cheer.
Step-by-Step Directions
To embark on your cookie-making adventure, follow these detailed steps to craft the Chamomile Charm Holly Cookies:
Preheat the oven to 350°F (175°C) and line two baking sheets with parchment paper. This will ensure an easy cleanup and prevent the cookies from sticking.
In a large mixing bowl, cream together the softened butter and granulated sugar until light and fluffy. This step creates the wonderfully airy texture that defines your cookies.
Add the egg, vanilla extract, and optional almond extract, mixing until fully incorporated. Make sure there are no lumps for a smooth dough.
In a separate bowl, whisk together the all-purpose flour, baking powder, and salt. This helps to evenly distribute the leavening agent and salt throughout the flour before combining with the wet ingredients.
Gradually add the dry ingredients to the wet mixture, mixing until a smooth dough forms. Be careful not to overmix, or your cookies may become tough.
Divide the dough into two portions. This will make it easier to roll out and shape the cookies.
Roll out each portion between two sheets of parchment paper to about 1/4-inch thickness. Using parchment paper prevents sticking and allows for easy transfer to the baking sheets.
Use a cookie cutter to cut out holly-shaped cookies, then transfer them to the prepared baking sheets. Arrange them so they have space to expand a bit while baking.
Bake for 10-12 minutes, or until the edges of the cookies are lightly golden. The centers should remain soft, ensuring a deliciously chewy texture.
Allow the cookies to cool completely on the baking sheets. This step is crucial for ensuring your icing will set properly when you decorate them.
For the royal icing, whisk together the powdered sugar, meringue powder, and water until smooth and stiff peaks form. The icing should be pliable enough to hold its shape but not so runny that it loses definition.
Add a few drops of white gel food coloring and mix to achieve a strikingly white icing, reminiscent of fresh winter snow.
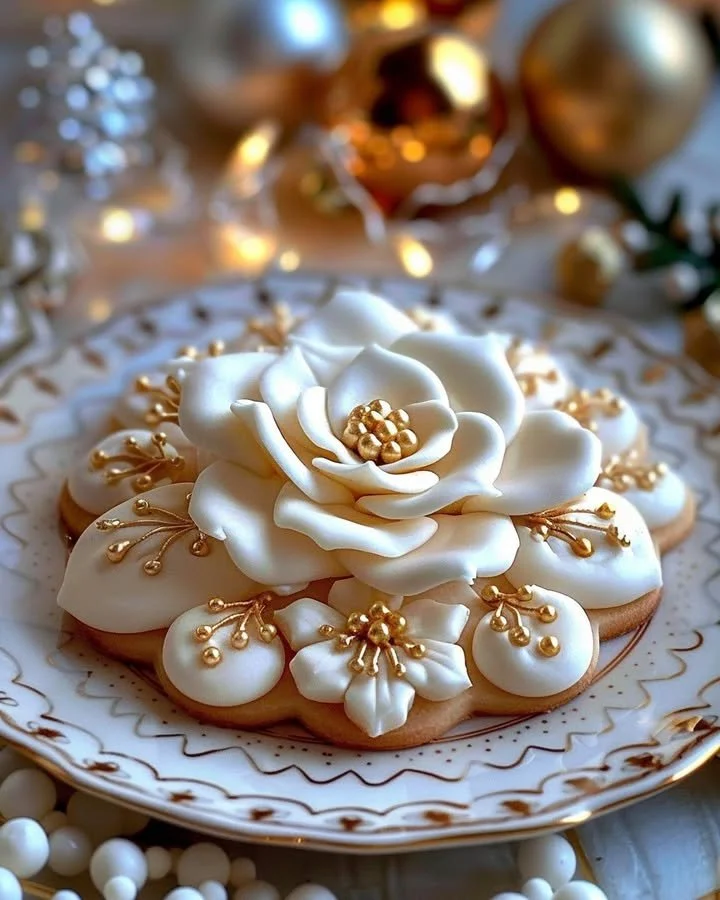
Once the cookies have cooled, use a piping bag to decorate each one with royal icing, creating holly leaf shapes or other festive designs. Let your creativity shine!
For extra holiday magic, gently brush the edges of the cookies with gold edible paint or luster dust, and add small gold sugar pearls as decoration. These touches elevate your cookies, making them a centerpiece for the dessert table.
Allow the icing to dry completely before serving or packaging. This ensures that your beautiful decorations remain intact.
Tips & Tricks
To enhance your cookie-making experience, consider the following tips:
- Ensure your butter is adequately softened for a smooth and creamy mixture. This normally takes about 30 minutes out of the refrigerator.
- Don’t skip the chilling step before rolling out the dough if you find it too sticky. Chill for 30 minutes for easier handling.
- When using royal icing, you can adjust the consistency depending on whether you want to pipe details or create flooded designs.
- Try to use a small offset spatula when applying the icing to create smooth surfaces.
- Make sure to add decorative elements quickly after icing, as the icing can set quickly and make it difficult for the decorations to adhere later.
Serving Suggestions & Pairings
Chamomile Charm Holly Cookies are perfect for various occasions:
- Serve them at holiday parties or cookie exchanges. Guests will love their vibrant colors and delicious flavors.
- Pair these cookies with a warm cup of chamomile tea or hot chocolate for a cozy winter treat.
- Package them beautifully in holiday-themed boxes or tins as thoughtful gifts for friends and family, adding a personal and heartfelt touch to your offerings.
- They make an excellent snack while you enjoy family game nights or movie marathons during the festive season.
Nutritional Information
One typical Chamomile Charm Holly Cookie contains approximately 150 calories, with about 8g of fat, 20g of carbohydrates, and 1g of protein. While these cookies are a delightful treat, it’s important to enjoy them in moderation. Balance your holiday indulgences with healthy meals and snacks throughout the day.
Storing Tips & Variations
- Store your decorated cookies in an airtight container at room temperature for up to one week. This will help them retain their freshness and flavor.
- For longer storage, freeze the un-decorated cookies. Layer them between sheets of parchment paper in a sealed container. They can be frozen for up to three months.
- When ready to enjoy, simply thaw at room temperature, and decorate as desired.
- Feel free to experiment with different shapes, colors, and flavors in your icing to personalize your cookies beyond the classic holly design.
Conclusion
Chamomile Charm Holly Cookies Blooming with Holiday Magic are not just a treat; they are an experience filled with love, creativity, and holiday spirit. As you bring this magical recipe into your kitchen, you’ll create lasting memories, whether baking with loved ones or enjoying a peaceful moment with a warm drink. Don’t hesitate to try this recipe and let your creativity shine. Bake, decorate, and share your experiences on social media or with friends and family. Happy baking!
FAQs
Can I use a different flavor of extract besides vanilla and almond?
Absolutely! Feel free to experiment with other extracts like lemon or orange for an exciting twist on the flavor.How can I make my royal icing colored without using gel food coloring?
You can use natural food dyes for a more organic approach, but keep in mind that the colors may be softer and less vibrant.Can I make these cookies gluten-free?
Yes, you can substitute all-purpose flour with a gluten-free flour mix specifically designed for baking. Ensure the mix includes a leavening agent for the best results.How do I prevent my cookies from spreading too much while baking?
Chilling the dough for at least 30 minutes before rolling it out can help prevent excessive spreading during baking.What should I do if my dough is too sticky?
If the dough is too sticky to roll, consider adding a little more flour while mixing. Or, you can chill the dough for 20-30 minutes to make it easier to handle.
Chamomile Charm Holly Cookies Blooming with Holiday Magic

Delightful holiday cookies with a whimsical charm, featuring a buttery flavor and enchanting holly shapes.
- Prep Time: 30 minutes
- Cook Time: 12 minutes
- Total Time: 42 minutes
- Yield: 24 cookies 1x
- Category: Dessert
- Method: Baking
- Cuisine: American
- Diet: Vegetarian
Ingredients
- 2 3/4 cups (345g) all-purpose flour
- 1 cup (225g) unsalted butter, softened
- 3/4 cup (150g) granulated sugar
- 1 large egg
- 1 tsp vanilla extract
- 1/2 tsp almond extract (optional)
- 1/2 tsp baking powder
- 1/4 tsp salt
- 4 cups (480g) powdered sugar
- 3 tbsp meringue powder
- 5–6 tbsp water
- White gel food coloring
- Gold edible paint or luster dust
- Small gold sugar pearls
Instructions
- Preheat the oven to 350°F (175°C) and line two baking sheets with parchment paper.
- Cream together the softened butter and granulated sugar until light and fluffy.
- Add the egg, vanilla, and optional almond extract, mixing until fully incorporated.
- Whisk together the flour, baking powder, and salt in a separate bowl.
- Gradually add the dry ingredients to the wet mixture, mixing until a smooth dough forms.
- Divide the dough into two portions for easier handling.
- Roll out each portion between two sheets of parchment paper to about 1/4-inch thickness.
- Use a cookie cutter to cut out holly-shaped cookies and transfer them to the prepared baking sheets.
- Bake for 10-12 minutes, or until the edges are lightly golden.
- Allow the cookies to cool completely on the baking sheets.
- Whisk together the powdered sugar, meringue powder, and water for royal icing.
- Add a few drops of white gel food coloring to the icing.
- Once cooled, decorate each cookie with royal icing.
- Brush the edges with gold edible paint or luster dust and add sugar pearls.
- Allow the icing to dry completely before serving.
Notes
Ensure your butter is adequately softened for best results. Chill the dough if it becomes sticky.
Nutrition
- Serving Size: 1 cookie
- Calories: 150
- Sugar: 20g
- Sodium: 100mg
- Fat: 8g
- Saturated Fat: 5g
- Unsaturated Fat: 3g
- Trans Fat: 0g
- Carbohydrates: 20g
- Fiber: 0g
- Protein: 1g
- Cholesterol: 30mg