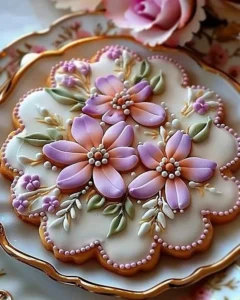
Easter Cookies with Chick and Flower Designs bring a delightful and festive spirit to your kitchen. This cheerful recipe yields soft, buttery cookies that are perfect for decorating and sharing with family and friends during the holiday season. The process is not only straightforward but also a fantastic way to spark creativity, making it an ideal activity for kids and adults alike. The anticipation of icing these cookies with vibrant colors transforms your kitchen into a joyful craft space, evoking warm memories and laughter. This step-by-step guide ensures that making these cookies is both easy and enjoyable, allowing you to perfect your decoration skills while indulging in some aromatic, fresh-baked goodness.
Ingredients
The ingredients for these delightful Easter Cookies with Chick and Flower Designs create a rich and satisfying dough that is perfect for shaping and decorating. Here’s what you’ll need:
- 250g butter (room temperature): Softened to creamy perfection, this will give your cookies that melt-in-your-mouth quality.
- 150g powdered sugar: This adds a sweet, light, and airy texture to the dough, balancing the richness of the butter.
- 1 egg: A key binding agent that helps hold everything together while adding a lovely richness.
- 1 tsp vanilla extract: For an aromatic and comforting flavor that enhances the sweetness of the cookies.
- 350g all-purpose flour: This forms the backbone of your dough, giving it structure and a tender crumb.
- 1 tsp baking powder: This leavening agent helps your cookies puff up slightly, creating a soft texture.
- Pinch of salt: Just enough to enhance the sweetness and balance the flavors.
- White and colored icing (for decoration): To bring your cookies to life with beautiful designs and shades.
- Food coloring (yellow, green, pink, blue): These vibrant hues will make your cookies festive and fun.
Cooking Time & Tips for Easter Cookies with Chick and Flower Designs
When it comes to preparing these festive cookies, timing is everything. You can whip up a batch relatively quickly or take your time to enjoy the baking process. The quick method allows you to prepare the dough and bake the cookies within an hour, perfect for a last-minute treat. However, if you prefer a more leisurely approach, consider chilling the dough for a more manageable consistency, enhancing the cookie’s shape and decoration.
Here are some practical tips for success:
- Ensure that your butter is truly at room temperature; this will make it easier to cream with sugar and yield a fluffier batter.
- Don’t skip the refrigeration step if your dough feels too sticky. It will be much easier to handle once it’s chilled.
- For perfectly shaped cookies, use a light dusting of flour on your work surface and rolling pin.
Step-by-Step Directions

Preheat your oven to 350°F (175°C) and line a baking sheet with parchment paper to prevent sticking.
In a large bowl, cream together the butter and powdered sugar until the mixture is light and fluffy. This stage is crucial for the lightness of your cookies.
Add the egg and vanilla extract to the bowl, and mix until fully combined. The batter should become smooth and glossy.
In a separate bowl, whisk together the flour, baking powder, and salt, ensuring there are no lumps. Combining these dry ingredients first helps distribute the baking powder evenly.
Gradually add the dry mixture to the wet ingredients, mixing until the dough comes together. You want a soft but workable dough that isn’t sticky.
If the dough is too soft, divide it into two portions and refrigerate for about 30 minutes. This will make rolling out much easier.
Roll out the chilled dough on a floured surface to about 1/4 inch thickness. Use cookie cutters to cut out shapes, creating delightful chick and flower designs.
Place the shaped cookies on the lined baking sheet, ensuring there’s enough space between them to allow for slight spreading.
Bake for 8-10 minutes, until the edges are just golden. Keep an eye on them to prevent over-baking.
Allow the cookies to cool completely on a wire rack. This cooling time is crucial for perfect icing application.
Prepare the icing by dividing it into separate bowls and adding food coloring to achieve your desired shades.
Use a piping bag to pipe designs onto the cooled cookies. Let your imagination run wild with designs and colors!
Allow the icing to dry completely before serving to ensure the designs hold their shape.
Serving Suggestions & Occasions
Easter Cookies with Chick and Flower Designs are a fantastic treat for various occasions. They are not just limited to Easter celebrations but can be a delightful addition to birthdays, tea parties, or casual family gatherings. Serve these cookies on a decorative platter, allowing their vibrant colors to shine. Pair them with a refreshing glass of lemonade or a warm cup of tea to complement their sweetness. They also make wonderful gifts for neighbors and friends when placed in a lovely box, showcasing your baking efforts.
Common Mistakes for Easter Cookies with Chick and Flower Designs
Not using room temperature ingredients: This is vital for achieving the right texture in your cookies.
Overmixing the dough: This can result in tough cookies, so mix just until the ingredients are combined.
Skipping the chilling step: If your dough is too soft, cookies may lose their shape during baking.
Not measuring ingredients accurately: Baking is a science, so precision is key. Use a kitchen scale for accuracy.
Baking on an ungreased tray: Always line your tray with parchment paper to avoid sticking.
Healthier Alternatives & Variations
For those looking to make healthier versions of these cookies, consider substituting some ingredients:
- Use coconut oil or applesauce in place of butter for a lower-fat option.
- Substitute half of the all-purpose flour with whole wheat flour to increase fiber content.
- Opt for a sugar substitute or honey for a lower-calorie sweetener while monitoring the consistency of your dough.
Variations can also elevate the classic recipe. For example, add citrus zest for a refreshing twist or incorporate chocolate chips or nuts for added texture—these small changes can create a whole new experience with the same base recipe.
FAQs
Can I freeze the cookie dough?
Yes, you can freeze the dough for up to three months. Wrap it tightly in plastic wrap and then in a freezer bag.How long will the decorated cookies last?
Properly decorated cookies can last about a week at room temperature if stored in an airtight container.Is it necessary to refrigerate the dough?
While it’s not strictly necessary, refrigerating the dough can improve the texture of your cookies and help them hold their shape better.What types of icing can I use for decoration?
You can use royal icing, buttercream, or water-based icing. Ensure it’s thick enough to hold designs, especially for intricate details.Can I use other shapes for the cookies?
Absolutely! Feel free to create any shape you desire for any occasion.How do I achieve vibrant icing colors?
Start with white icing and add food coloring gradually, mixing thoroughly until you achieve the desired shade.
Conclusion
Easter Cookies with Chick and Flower Designs are not only a treat; they represent joy, creativity, and togetherness during the festive season. With easy-to-follow steps and a few vibrant touches, you can create delightful cookies that everyone will adore. Don’t wait any longer—grab your apron, gather the ingredients, and let the fun begin in your kitchen! You are just a few steps away from experiencing the bliss of freshly baked, beautifully decorated cookies that will spread happiness and sweeten your celebrations. Happy baking!
PrintEaster Cookies with Chick and Flower Designs

Delightful soft, buttery cookies perfect for decorating and sharing during the holiday season.
- Prep Time: 15 minutes
- Cook Time: 10 minutes
- Total Time: 25 minutes
- Yield: 24 servings 1x
- Category: Dessert
- Method: Baking
- Cuisine: American
- Diet: Vegetarian
Ingredients
- 250g butter (room temperature)
- 150g powdered sugar
- 1 egg
- 1 tsp vanilla extract
- 350g all-purpose flour
- 1 tsp baking powder
- Pinch of salt
- White and colored icing (for decoration)
- Food coloring (yellow, green, pink, blue)
Instructions
- Preheat your oven to 350°F (175°C) and line a baking sheet with parchment paper.
- Cream together the butter and powdered sugar until light and fluffy.
- Add the egg and vanilla extract to the bowl, mixing until fully combined.
- Whisk together the flour, baking powder, and salt in a separate bowl.
- Gradually add the dry mixture to the wet ingredients, mixing until the dough comes together.
- If the dough is too soft, refrigerate for about 30 minutes.
- Roll out the chilled dough on a floured surface to about 1/4 inch thickness.
- Cut out shapes using cookie cutters for chick and flower designs.
- Place the cookies on the lined baking sheet with space between them.
- Bake for 8-10 minutes until edges are just golden.
- Cool the cookies completely on a wire rack.
- Prepare icing by dividing it into bowls and adding food coloring.
- Use a piping bag to decorate the cooled cookies with icing.
- Let the icing dry completely before serving.
Notes
Ensure butter is at room temperature and don’t skip the chilling step for the dough.
Nutrition
- Serving Size: 1 cookie
- Calories: 150
- Sugar: 8g
- Sodium: 80mg
- Fat: 6g
- Saturated Fat: 4g
- Unsaturated Fat: 2g
- Trans Fat: 0g
- Carbohydrates: 20g
- Fiber: 0g
- Protein: 2g
- Cholesterol: 25mg