
No Knead Artisan Bread
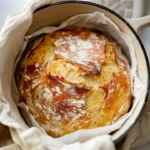
No Knead Artisan Bread is a game-changer for home bakers. This recipe is here to simplify the bread-making process while delivering deeply flavorful, crusty artisan bread that will impress your family and friends. With a golden crust and a soft, airy interior, this bread is a delight to enjoy fresh from the oven or as a companion to your meals. Perfect for your next gathering or a cozy evening at home, this bread will fill your kitchen with irresistible aromas. What’s not to love? Follow this step-by-step recipe to learn how incredibly easy it is to bake your own artisan bread, even without kneading!
Why You’ll Love This Recipe
This No Knead Artisan Bread recipe is alluring for several reasons. First, the prep time is minimal, allowing you to mix the ingredients, set the dough aside, and go about your day. It is family-friendly, making it an enjoyable weekend project for everyone. With just a few staple ingredients, you can create something that feels special and homemade. You can make this bread either quickly or slowly, adapting the timing to your schedule while still achieving perfect results every time.
For No Knead Artisan Bread
Ingredients:
- 3 cups bread flour (450g): The foundation of this loaf, providing that hearty texture.
- 1 tablespoon white granulated sugar: Just a hint of sweetness to help the yeast activate.
- 2 teaspoons dried instant or rapid rise yeast: Essential for that lovely rise.
- 1 1/2 teaspoons salt: Enhances flavor and strengthens the dough.
- 1 1/2 cups warm water (375 ml): Activates the yeast and creates the perfect dough consistency.
- 1 tablespoon olive oil: Adds richness and flavor to the bread.
Step-by-Step Directions
To create your No Knead Artisan Bread, first, combine the bread flour, sugar, yeast, and salt in a large mixing bowl. Use a whisk to fully integrate the dry ingredients, ensuring an even distribution of the yeast. Next, add the warm water and olive oil into the mixture. Stir until all ingredients come together to form a wet, sticky, and shaggy dough, which is key to achieving that artisan texture.
Once combined, lightly spray the top of the dough with cooking oil to prevent drying. Cover the bowl with plastic wrap and place a dry tea towel over it, allowing it to rise in a warm, draft-free location for 2 to 3 hours, or until the dough has doubled in size.
While the dough is rising, preheat your oven to 450°F (230°C). Place a Dutch oven or heavy pot with a lid inside for at least 30 minutes to heat thoroughly. As the dough finishes rising, flour your work surface lightly and use a spatula to scrape the dough out onto it. Gently fold the dough over itself several times to form a round shape.
Transfer the rounded dough onto a sheet of parchment paper, keeping the smooth side facing up. Cover it loosely while your pot preheats. When the pot is hot, carefully remove it from the oven, lift the dough using the parchment paper, and place it into the pot. Cover with the lid, then bake for 30 minutes. Finally, remove the lid and bake for an additional 12 to 15 minutes, until the crust turns golden brown and delicious. Let the bread cool on a wire rack for about 10 minutes before slicing.
For No Knead Artisan Bread
- Combine the flour, sugar, yeast, and salt in a large bowl.
- Add warm water and olive oil; mix until the dough is wet and shaggy.
- Lightly spray the top, cover, and let rise for 2-3 hours until doubled.
- Preheat a Dutch oven at 450°F (230°C) for 30 minutes.
- Flour the work surface, scrape out the dough, and form a round shape.
- Place the dough on parchment paper, keep covered while the oven preheats.
- Transfer the dough into the hot pot, cover, and bake for 30 minutes.
- Remove the lid and bake for an additional 12-15 minutes to finish.
- Cool for 10 minutes on a wire rack before slicing.
Tips & Tricks
Here are some tips to elevate your No Knead Artisan Bread. To enhance flavor, consider adding herbs, garlic, or cheese to your dough before the initial rise. If you’re fond of seeds, sprinkle sesame or poppy seeds on top right before baking for extra crunch. A little patience goes a long way: allowing the dough to rise for longer can result in a more robust flavor profile. Also, for a perfect crust, try placing a shallow pan of water in the bottom of your oven while baking. The steam produced creates a crispy exterior while keeping the inside soft and chewy.
Serving Suggestions & Pairings
The beauty of No Knead Artisan Bread extends to its versatility for serving and pairings. Fresh out of the oven, it’s perfect on its own, but try slathering warm slices with butter or olive oil for a simple indulgence. Pair it with hearty soups or stews, like a vegetable minestrone or creamy tomato basil soup. For a delightful brunch, serve this bread alongside scrambled eggs and smoked salmon. It can also hold its own as a base for bruschetta, topped with fresh tomatoes and basil.
Nutritional Information
Each slice of No Knead Artisan Bread has approximately 150 calories, providing a comforting option without excessive guilt. The bread mainly consists of carbohydrates with a modest amount of protein and dietary fiber, making it a wonderful addition to a balanced meal. Keep in mind that indulging in quality bread can be a treat, so savor each slice mindfully!
Storing Tips & Variations For No Knead Artisan Bread
To keep your No Knead Artisan Bread fresh, store it at room temperature in a brown paper bag for up to three days. For longer storage, it freezes beautifully! Just slice it first, then wrap it tightly in plastic wrap and place it in a freezer bag. It can last up to three months in the freezer. When you’re ready to enjoy, reheat slices in a toaster or oven, or let it thaw at room temperature.
For variations, you can substitute part of the bread flour with whole wheat flour for added nutrition. Incorporating different seeds or nuts can also add delightful textures and flavors to the bread.
Conclusion For No Knead Artisan Bread
If you’re ready to embark on a delightful baking adventure, there’s no better time to try your hand at No Knead Artisan Bread. With its straightforward process and impressive results, you’ll be surprised at how rewarding it is to create this homemade masterpiece. Don’t wait any longer—whip up a batch today and savor the satisfaction that comes with baking your own bread!
FAQs
Can I use all-purpose flour instead of bread flour?
Yes, you can use all-purpose flour, but the texture may be slightly different—less chewy.How long can I store this bread for?
You can store it at room temperature for about three days or freeze it for up to three months.What if I don’t have a Dutch oven?
A heavy oven-safe pot with a lid will work just as well. You can also use a baking stone, but the method of lid coverage will differ.Can I add spices or herbs to the dough?
Absolutely! Mixing in herbs like rosemary or thyme can add wonderful flavor to your bread.What’s the best way to slice this bread?
Allow the bread to cool for at least 10 minutes before slicing to prevent it from becoming gummy. A serrated bread knife works best.
No Knead Artisan Bread
A game-changing recipe for crusty, flavorful artisan bread that requires no kneading. Perfect for any gathering or cozy evening at home.
- Prep Time: 15 minutes
- Cook Time: 42 minutes
- Total Time: 57 minutes
- Yield: 8 servings 1x
- Category: Bread
- Method: Baking
- Cuisine: American
- Diet: Vegetarian
Ingredients
- 3 cups bread flour (450g)
- 1 tablespoon white granulated sugar
- 2 teaspoons dried instant or rapid rise yeast
- 1 1/2 teaspoons salt
- 1 1/2 cups warm water (375 ml)
- 1 tablespoon olive oil
Instructions
- Combine the flour, sugar, yeast, and salt in a large bowl.
- Add warm water and olive oil; mix until the dough is wet and shaggy.
- Lightly spray the top, cover, and let rise for 2-3 hours until doubled.
- Preheat a Dutch oven at 450°F (230°C) for 30 minutes.
- Flour the work surface, scrape out the dough, and form a round shape.
- Place the dough on parchment paper, keep covered while the oven preheats.
- Transfer the dough into the hot pot, cover, and bake for 30 minutes.
- Remove the lid and bake for an additional 12-15 minutes to finish.
- Cool for 10 minutes on a wire rack before slicing.
Notes
Add herbs, garlic, or cheese for enhanced flavor. For a perfect crust, place a shallow pan of water in the oven while baking.
Nutrition
- Serving Size: 1 slice
- Calories: 150
- Sugar: 1g
- Sodium: 200mg
- Fat: 3g
- Saturated Fat: 0.5g
- Unsaturated Fat: 2.5g
- Trans Fat: 0g
- Carbohydrates: 28g
- Fiber: 1g
- Protein: 5g
- Cholesterol: 0mg